Art Update: The process of painting "Petals"

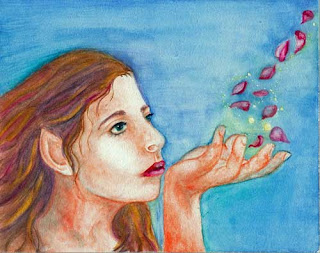
It has been a really long time since I did an art post, so I decided to write a 'tutorial' style post on the process I used in my latest watercolor painting, Petals. To the right is an image of the final product. Like all the images in this post, click on it to see a larger version.
STEP ONE: SKIN
 Watercolor is a very unforgiving medium (it is translucent, so mistakes show through the paint) so the very first thing I did was very lightly sketch a rough outline of the girl on my piece of clayboard. I then very slowly started working on the skin. The color here is actually Cadmium Red, Cad Yellow, and Lemon yellow mixed together. On my pallet this creates a disturbingly red-orange color, and I remember, years ago, thinking I couldn't possibly have mixed it correctly when my watercolor teacher told me to use those colors. On top of white paper (or clayboard, as in this case) it does make a nice peachy skin tone. I actually know no other recipe for pale skin tone with
 watercolors. (Because you don't use white)
To create depth to the skin, I used two brushes: one to very lightly lay down paint, and a (paint-free) wet brush to blend the paint with. The goal here is to layer on color without leaving any hard lines. I applied the most color to shadow areas and folds. The same process was also used for the skin on the hand. I left a few harder lines than I meant to on the hand, trying to differentiate fingers. (As I've mentioned before, hands are very hard.)
STEP TWO: HAIR
 Now that I have the skin, the next step is to add in hair. I recently acquired some watercolor crayons, and part of the reason I decided to do this painting was to try them out. Well, really I do know better than trying out a new medium on a 'real' project, but I did it anyway. I sketched highlights and shadows into the hair with the crayons, but I
 didn't consider how much paint I was actually putting down. Once I added water, the hair turned into one big monotonous mess. Ideally, some of the white of the paper should show through when using watercolors, but overdoing it with the crayons really put a crimp in that plan. I scrubbed away as much of the color as a cood in some spots, but I still lost the natural clayboard highlights. Does that mean I hate the crayons and will never use them again? No. Actually, I ended up using more in the hair trying to correct my error. The crayons give me deep, strong colors that are easy to apply thickly, so I went back in and used some yellow for highlights, and some purples for my darker midtones. I then went over all of this with a light wash of brown to bring all the colors together. The effect turned out not too shabby.
STEP THREE: DETAILS
 Now I went back in and started adding the finer details. Color to the eyes and lips. I put in her eyebrows and better defined the shape of her nose and lips. I'm still using the two brush technique (one with paint, one with only water) but in some places I'm now leaving harder lines on one side
 and only blending away from the line. In the image to the right you can see where I've gone in and added even more definition to the lips and eyes. I also scrubbed out some of the darker lines in the chin and palm and added blue in the shadows of the flesh. I also went back into the hair to add deeper and darker shadows so it would fall behind the ear and neck, and to make the yellow highlights really pop.
STEP FOUR: BACKGROUND & FINISHING TOUCHES
 Now, in all honesty, I probably should have been working on the background and developing it as I did the foreground...that was how I was taught in school, but *shrugs* I didn't. On the left you'll see I painted in my flower petals using reds with shadows of blue. You might also notice the small grey dots around the petals. They are made of a foul smelling substance that I believe is called masking fluid. It started as a liquid and I used a fine tiped pallet knife to drip the dots onto the clayboard. The masking fluid the
 n dried to a rubbery substance that protected the surface under it from paint.
With the flowers and the figure painted, all that was left was the 'empty' background. Using a large flat brush full of clean water, I wet the background and then dropped color on it. The main color is blue (as you can probably tell) but it was pounded into my head that you never leave more than a few inches without a color changes, so if you pay attention, you might notice greens and purples in the mix as well. (this isn't actually a random hodpodge mix: using color theory, the areas with more green and blue (cool colors) move backward and the areas with reds and yellows (warm colors) move forward.) a high concentration of yellow s also added above the palm of her hand and around the flowers. I also rubbed away the masking fluid, revealing clean white clayboard beneath it. I added a bit of yellow to the white dots, so they would blend in a little but still glow. A little bit of the blue crawled up onto the skin and I had to scrub it alway best I could. Then I scanned it into the computer so the details would show up clearer than in the photographs. The color is also closer
 to true in the scan. (though the lower arm isn't quite so orange in the painting)
And that's it, the finished product. I realized after scanning it in, that I didn't give her a left shoulder, and that part of her left bicep should also be visible with the position of her arm...thats why the arm looks so out of place. Unfortunately, the painting is beyond the stage where I could fix that easily. The good news is, I can fix it digitally later as I plan to turn this painting into a web graphic to use when I redesign my site. (I actually painted it specifically for the purpose.)
I would estimate it took between nine and fifteen hours to paint "Petals", beginning to end (I'm not sure of the exact time because I wasn't paying a lot of attention. I started working on it Friday and finished today, but I didn't get much time to work on it over the weekend.) Well, that is about all I can say on this painting. I hope you found this little tutorial at least interesting if not helpful.
UPDATE: FINAL STEP: CG
 I wasn't going to go on to the CG tonight, but I did anyway. So here you can see I added in her shoulder and upper arm. I also smoothed some of the rougher areas and repainted the hair. The background was removed in preparation for using the image as a webgraphic so I had to add back in the glow...and frankly...I really like the glow on black. Well...that's really the end this time.

Comments
I've always enjoyed seeing the process a piece of art goes through, but usually you only get to see the final product. Anytime I'm on an artist's site and I notice they have a tutorial section, I always stop by to look because it fascinates (and befuddles) me to see the break down of the steps. I can't even compare to most of the artist sites I haunt, but I thought I would share what I could--I've picked up useful bits in the strangest of places, maybe someone will find something useful here.